How to Find the Best 90 Degree Corner Clamp for Woodworking
How to Find the Best 90 Degree Corner Clamp for Woodworking
Ask any woodworker what tool they wish they’d bought sooner, and corner clamps for woodworking come up every time. Not because they’re complicated, but because the difference between a decent one and the wrong one shows up instantly — in slipping joints, off-square cabinets, and frustrating glue-ups that fall apart the moment you let go.
The market is flooded with options. Aluminum clamping squares, spring-loaded jaw clamps, V-wedge systems, strap clamps — every type of woodworking corner clamp promises perfect 90° results, yet they’re built for very different tasks. Buy the wrong style for your project and it’ll feel like the tool is working against you. Buy the right one and it genuinely does the job of a third hand.
This guide cuts through the noise. We’ll walk you through every factor that actually matters when choosing 90 degree clamps for woodworking — so you know exactly what to look for before spending a cent.

Why the Right Corner Clamp Changes Everything
Most woodworking projects hinge on right angles. A cabinet carcass, a drawer box, a bookcase, a picture frame — all of them rely on corners that are exactly 90°. Drift even a couple of degrees and you’ll feel it: doors that don’t hang straight, drawers that bind in their slides, frames with visible gaps at the corners.
Holding those angles by hand while glue dries or screws go in is practically impossible to do consistently. Right angle clamps are some of the most helpful woodworking tools because they do the job of that third hand — holding pieces in position by hand while gluing or fastening them together is nearly impossible any other way.
The catch is that corner clamps for wood are not one-size-fits-all. A spring clamp that works beautifully for a small picture frame will be completely inadequate for a cabinet carcass. A heavy V-jaw clamp that’s perfect for drawer assembly can be overkill — and awkward — on thin trim work. Understanding which style of corner clamps woodworking tasks actually call for is the first step to getting consistent results.
Step 1: Know the Different Types of 90° Corner Clamps
Before evaluating any specific features, you need to understand what category of clamp actually suits the work you do most. There are four main types, each with distinct strengths.
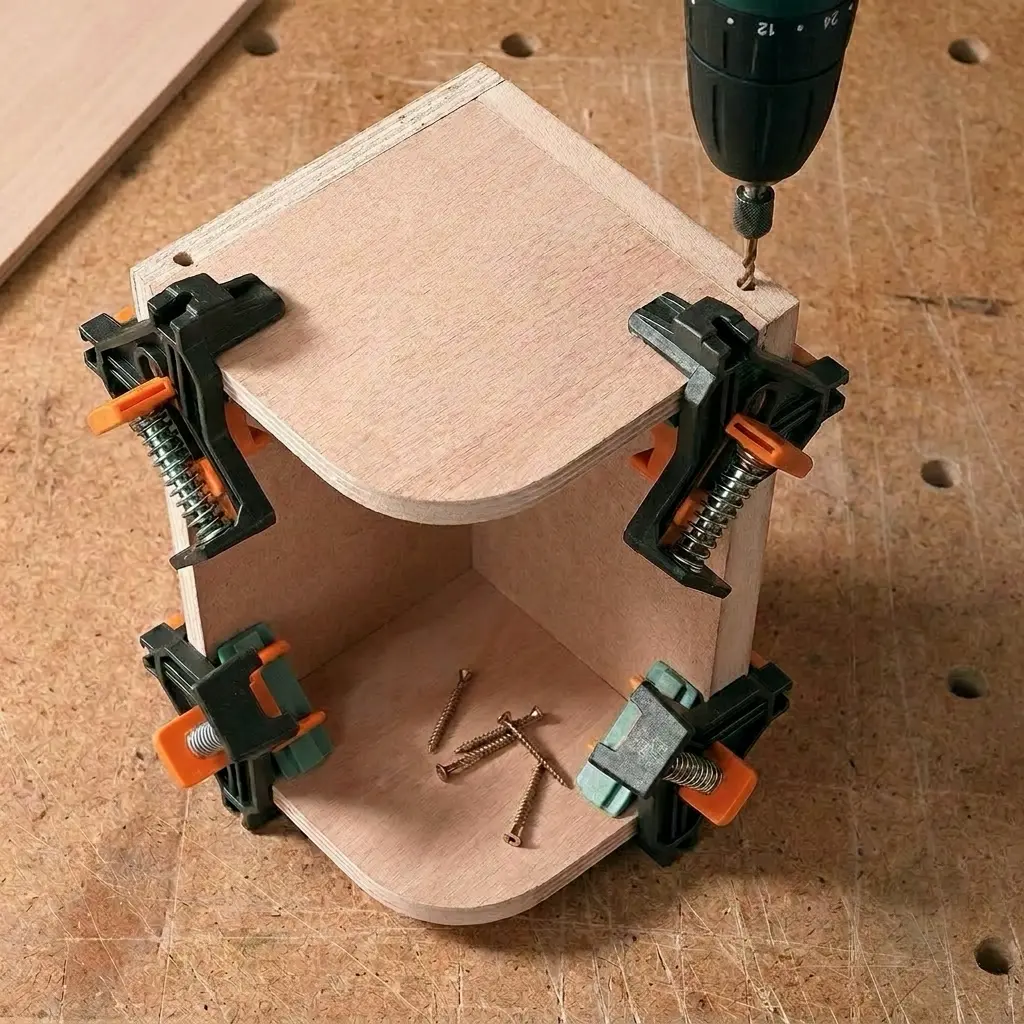
Aluminum Clamping Squares (Positioning Squares)
These are flat, L-shaped blocks machined from aluminum alloy with screw rods that tighten against the outside faces of your boards. They sit flush on your workbench and hold the corner from the outside while you glue, nail, or drive screws. They’re typically sold in packs of four so you can clamp all corners of a box or frame at once.
These tools ensure accurate alignment and facilitate secure fastening — an example being securing two pieces of wood to form a right-angled frame before driving screws into the joint.
V-Jaw Corner Clamps
These handheld clamps feature two opposing jaw pads set at 90° — typically an outer V-channel and an inner wedge. You squeeze them onto the joint and they grip both pieces simultaneously, applying inward pressure to hold the right angle. The V-wedge jaws grip the mating pieces securely, ensuring the pieces sit at precise 90° angles while you drive in screws, nails, or other fasteners — and edge stops help align the edges of the pieces for accurate assembly.
Spring-Loaded Corner Clamps
The simplest and most affordable type: two spring-loaded jaws that snap onto the corner and hold by tension alone. Quick to deploy, easy to move around, and light enough that they won’t pull smaller pieces out of alignment.
Strap Clamps with Corner Pieces
A nylon or metal strap wraps around all four sides of your assembly, with right-angle corner inserts protecting the edges. You place the strap around the workpiece, position the corner braces while pulling out the slack, then twist the handle to increase clamping pressure. These are the best option when you need to pull all four corners of a frame or cabinet together evenly and simultaneously.
Step 2: Match Jaw Capacity to Your Material Thickness
This is the most commonly overlooked mistake when buying corner clamps, and it leads to real problems on the bench.
Here’s a practical breakdown:
- 3/16″ to 3/4″ material (thin plywood, drawer boxes, small frames) — Most spring-loaded and compact aluminum clamps cover this range comfortably. Look for a jaw opening of at least 3/4″.
- 3/4″ to 1″ material (standard cabinet plywood, 1× lumber) — The majority of quality aluminum clamping squares and V-jaw clamps cover this. This is the most common range for cabinet making.
- 1″ to 2″+ material (thick hardwood, face frames, solid wood furniture) — You need a heavy-duty clamp here with wide self-adjusting capacity. This kind of range is rare and genuinely useful for versatile shops.
Always check the manufacturer’s maximum clamping thickness before buying, especially for aluminum positioning squares. Some max out at 3/4″ (19mm), which works fine for standard cabinet ply but won’t fit your face-frame stock.

Step 3: Evaluate Build Material and Rigidity
The body material of a corner clamp directly determines whether it actually holds a true 90° under pressure — or slowly deflects, letting your joint drift as you tighten. This is one of the sharpest differences between the best woodworking clamps and cheap alternatives that look similar in product photos.
Durable clamps made of aluminum alloy and steel won’t bend or warp under heavy pressure, giving you an assured perfect right-angle connection. When it comes to finding the best clamps for woodworking, here’s how the main materials compare:
The sweet spot for most woodworkers. Lightweight enough to handle comfortably, rigid enough not to flex under moderate to heavy clamping pressure. CNC-machined aluminum squares are accurate straight from the factory and stay that way. Look for anodized finishes (red or black) that resist corrosion and wear.
Found in higher-end V-jaw clamps like those from Bessey. Heavier than aluminum, but essentially indestructible and the most accurate option for heavy cabinet work or production use.
Used in some spring-loaded styles and budget positioning squares. Adequate for light work and thin stock, but plastic flexes. If you’re assembling anything heavier than a small picture frame, step up to aluminum.
Any clamp where the clamping surface is plastic and the maximum capacity is under 1/2″ — these will flex before they’re tight enough to be useful.
Step 4: Check Access for Fastening
A corner clamp that perfectly holds your angle but blocks your drill or driver is a clamp you’ll stop using within a week.
Things to check before buying:
- Does the clamp leave the corner accessible? Aluminum positioning squares that sit on the outside of the joint generally leave the inside completely open. V-jaw clamps vary — the better ones have cutouts or open designs that let you drive screws without removing the clamp.
- Can you fit a pocket-hole jig? If you’re building with Kreg-style pocket screws, make sure your clamp doesn’t block the drill guide or screw driver access.
- Does it work on both corners and T-joints? Standard corner joints are where two ends meet. T-joints are where one board meets the face of another (like a shelf dado or cabinet divider). Not every clamp handles both — check the specs.
Step 5: Think About How Many You Need
Buying a single corner clamp is rarely the right move. Most projects require at least two, and box or cabinet assembly is dramatically easier with four. Investing in a proper woodworking clamps set upfront saves you from scrambling mid-glue-up.
If you are assembling boxes and cabinets, two corner clamps make life easier because you can lock both corners and stop the whole carcass parallelogramming.
- 2 clamps minimum — Enough for simple L-joints and small frame assemblies. You’ll be repositioning them as you work.
- 4 clamps — The standard for drawer box and cabinet work. Lock all four corners simultaneously, drive your fasteners, move on.
- 8+ clamps — Worth it for anyone doing production runs of boxes, drawers, or cabinets, where setting up individual joints one at a time kills your workflow.
Aluminum positioning square sets typically come in packs of 4, and their per-clamp price drops significantly in larger sets. If you know you’ll be making multiple drawer boxes or a set of cabinets, buying a full woodworking clamps set upfront is almost always more economical than buying singles and restocking later.
Step 6: Look for Surface Protection
If you work with MDF, melamine, or finished timber, go for corner clamps with broad, flat jaw faces and smooth pressure control so you do not bruise edges.
Several design features protect your workpiece:
- Chamfered edges on aluminum squares prevent digging into the wood surface during tightening.
- Rubber or TPR-coated jaw pads on V-jaw clamps grip without marring finished surfaces.
- Plastic nut handles (vs. bare metal rods) on clamping squares give you better control and prevent overtightening.
- Wax paper between clamp and glue surface is a good habit regardless — prevents the clamp from bonding to the workpiece if squeeze-out reaches it.
If you’re working with pre-finished panels or veneer plywood, jaw face protection isn’t optional — a bare aluminum edge left against a finished surface under pressure will leave a mark.
Step 7: Verify Angular Accuracy Out of the Box
Not all clamps ship at exactly 90°. This sounds alarming but it’s a real issue with lower-quality aluminum squares — if the mold isn’t machined accurately, the clamp will consistently produce joints that are slightly off.
The primary function of a quality corner clamp is to maintain a precise 90-degree angle during the joining process. Variations from this ideal angle can lead to racking, instability, and visual imperfections in the finished product.
How to test your clamps when they arrive:
- Place two scrap boards into the clamp and tighten.
- Check the inside corner with a reliable engineer’s square or combination square.
- If it reads true, you’re good. If it reads off by even a degree, test the other clamps in the set — the problem may be isolated to one unit.
With quality CNC-machined aluminum squares, this is rarely an issue. With very cheap budget sets, it happens more than it should. It’s worth the two minutes to verify before you rely on them for a real project.
When to Pair Corner Clamps with Bar Clamps or Long Clamps
Corner clamps are precision alignment tools — but they’re not always the only clamp you need on a job. Knowing when to combine them with other clamping types is what separates a smooth assembly from a stressful one.
Bar clamps for woodworking (also called pipe clamps or F-clamps) apply long-range inward pressure across wide panels. They’re essential when you’re gluing up wide boards into tabletops or clamping the full length of a cabinet side. Corner clamps register your 90° angle; bar clamps for woodworking supply the clamping force along the joint’s length. Used together, you get both precision alignment and strong, even glue pressure.
Long clamps for woodworking serve a similar role on larger assemblies — think full cabinet carcasses, workbench frames, or wide face frames. A set of long clamps for woodworking (typically 24″ to 48″ bar or pipe clamps) gives you the reach to span wide panels or pull a full cabinet carcass square while your corner clamps hold the angle at each joint. If your shop work regularly involves panels wider than 12″, having at least two long clamps alongside your corner clamp set is worth the investment.
- Set your corner clamps at each joint to lock the 90° angle
- Apply bar or long clamps across the full width to pull the panels tight
- Check diagonals for square before the glue sets
- Drive your fasteners with everything locked in place
Corner clamps alone won’t always supply enough outward pressure to close a glue joint fully. But combined with the right bar or long clamps, you get a complete clamping setup that handles alignment and pressure simultaneously.
Quick Buying Checklist
Use this as your decision filter before hitting “add to cart”:
| Feature | What to Look For |
|---|---|
| Clamp type | Positioning squares for boxes/cabinets; V-jaw for T-joints; spring for light work |
| Jaw capacity | Must exceed your thickest material (check in mm AND inches) |
| Body material | CNC aluminum alloy for most work; cast steel/iron for heavy-duty |
| Surface protection | Chamfered edges, coated pads, or rubber jaw faces |
| Fastening access | Open design or cutouts for drill/driver clearance |
| T-joint capability | Required if you build shelving, cabinets, or dividers |
| Quantity | Budget for 4 minimum; 8 for production — buy as a woodworking clamps set |
| Accuracy verification | CNC-machined bodies; check reviews for squareness consistency |
| Pairing | Use bar clamps or long clamps for wide-panel pressure alongside corner clamps |
The Bivarlo 90° Corner Clamp
Machined from high-strength aluminum alloy with a CNC-processed body and anodized red finish, it delivers the rigidity and squareness accuracy that woodworking actually demands. Dual-scale markings in both metric and imperial. L-bolt clamping system with capacity up to 90mm (3.5″) — equally at home on drawer ply, cabinet panels, and solid hardwood face frames.
View the Bivarlo 90° Corner ClampFinal Thoughts
Finding the best 90 degree corner clamp for woodworking isn’t about buying the most expensive option or the one with the best Amazon photos. It’s about matching the right type, the right jaw capacity, and the right build quality to the work you actually do.
A light-duty spring clamp has its place. So does a set of four precision aluminum corner clamps for woodworking. And for bigger assemblies, pairing them with the right bar clamps or long clamps completes your setup. The woodworker who understands those distinctions — and buys accordingly — is the one who stops fighting their tools and starts building things that actually come out square.
Start by identifying your most common project type. Then work through the checklist above. You’ll land on exactly the right clamp — and the next time you’re gluing up a cabinet carcass or assembling drawer boxes, you’ll wonder how you managed without it.